

Tape-in extensions tutorial: Achieve a seamless, natural look
TL;DR:
- Tape-in extensions provide a natural, undetectable way to add length and volume.
- Proper preparation, precise application, and gentle aftercare extend their lifespan.
- Building confidence through practice enhances technique and achieves professional-looking results.
You’ve tried volumising sprays, thickening shampoos, and every styling trick in the book, yet your hair still falls flat or stops growing past a certain length. Tape-in extensions are the solution that professional stylists and savvy home users reach for when they want real, lasting results. A tape-in extension is a pre-taped weft of human hair that sandwiches a thin section of your natural hair between two adhesive strips, creating a bond that lies completely flat against the scalp. When applied correctly, they are virtually undetectable. This tutorial walks you through every stage, from gathering your tools to long-term aftercare, so you can achieve a full, natural-looking result with confidence.
Table of Contents
- What you’ll need before starting
- Step-by-step guide to applying tape-in extensions
- Blending and styling for a flawless finish
- Troubleshooting and common mistakes
- Caring for tape-in extensions: Aftercare essentials
- What most tutorials overlook: Building confidence in your technique
- Ready for flawless tape-ins? Shop premium extensions
- Frequently asked questions
Key Takeaways
| Point | Details |
|---|---|
| Prep is key | Start with clean, sectioned hair and the right tools to ensure optimal hold. |
| Follow precise steps | Accurate placement and pressing of tape-ins create long-lasting, natural-looking results. |
| Blend and care | Blend extensions with your own hair and use gentle, proper aftercare for the best longevity. |
| Troubleshoot issues | Address common mistakes quickly and adjust for a seamless, comfortable fit. |
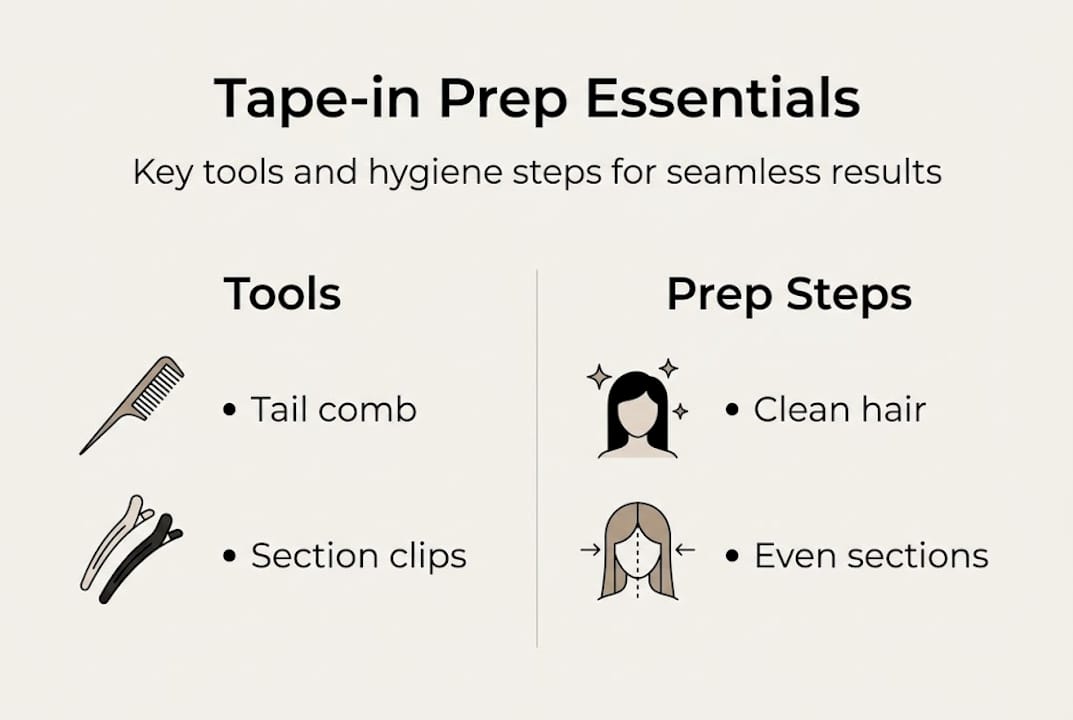
What you’ll need before starting
Now that you know the power of tape-ins, it’s time to gather your essentials and get prepped. Skipping the preparation stage is the single fastest way to end up with extensions that slide out within days. Proper preparation and clean hair are critical for tape-in extension adhesion, so treat this checklist as non-negotiable.
| Tool or material | Purpose |
|---|---|
| Tape-in extensions | The wefts that add length and volume |
| Tail comb | Creates clean, precise sections |
| Sectioning clips | Holds hair out of the way while you work |
| Clarifying shampoo | Removes oils and product residue before application |
| Extension pliers | Presses tape bonds firmly together |
| Heat tool (optional) | Activates adhesive for a stronger bond |
| Mirror set | Allows you to see the back of your head clearly |
Understanding the different hair extension types available helps you confirm that tape-ins are the right match for your hair texture and lifestyle before you invest.
Recommended preparation steps:
- Wash your hair with a clarifying shampoo 24 hours before application to strip away oils and silicone build-up
- Blow-dry your hair completely because moisture weakens adhesive bonds
- Detangle from ends to roots using a wide-tooth comb
- Avoid applying any conditioner, serum, or oil to the hair after washing
- Allow your scalp to rest overnight so natural oils do not interfere with the tape
For a thorough walkthrough on preparing your natural hair before any extension service, reviewing a dedicated guide will save you from the most common early mistakes.
Pro Tip: Before you begin sectioning, divide your hair into four quadrants using clips. Even quadrants mean even tension, and even tension means extensions that lie flat and last longer.
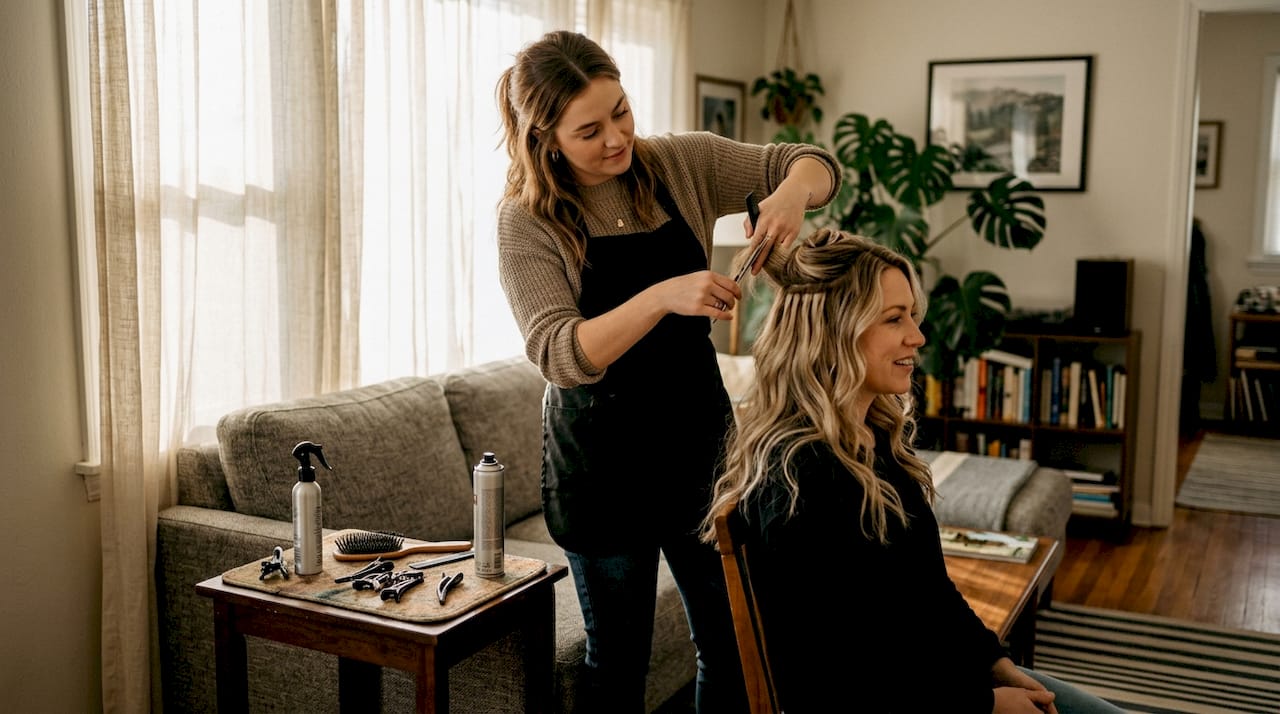
Step-by-step guide to applying tape-in extensions
Once your tools are ready and your hair is prepped, move on to the heart of the process: applying the extensions step by step. Following each step in order ensures the extensions lie flat and remain secure throughout their wear cycle.
- Section your hair horizontally. Start at the nape of the neck and create a clean, horizontal parting about 1 cm above the hairline. Clip everything above this section out of the way.
- Peel the backing off one extension weft. Handle the adhesive strip as little as possible to avoid transferring oils from your fingers.
- Position the first weft. Place the sticky side of the extension against the underside of your sectioned hair, roughly 1.5 cm away from the scalp. Never place it directly at the root.
- Sandwich the hair. Take a second weft, peel its backing, and press it firmly on top of the first weft with your natural hair caught between the two adhesive strips.
- Press firmly with pliers. Clamp the bond with extension pliers for 5 to 10 seconds. If you are using a heat tool, apply gentle warmth for a stronger seal.
- Move up in sections. Work your way up the head in horizontal rows, leaving at least 1.5 cm between each row to prevent visible gaps.
- Check for overlaps. Run your fingers across each bond to confirm no two wefts are stacked on top of each other.
For a polished result, consider cutting extensions for a natural finish once all wefts are in place. Reviewing hair extension basics can also help beginners understand the broader context of each step.
Caution: Placing tape bonds closer than 1 cm from the scalp creates tension on the follicle, which can lead to breakage and discomfort over time. Always leave adequate space.
Pro Tip: Use a handheld mirror alongside a wall mirror when working on the back sections. Seeing what you’re doing in real time prevents crooked rows that are difficult to fix once the bond is set.
Blending and styling for a flawless finish
After installing your new tape-ins, it’s time to make them look naturally yours through expert blending and styling. Blending techniques are key to achieving a natural, seamless finish with tape-in extensions, and skipping this step is what separates a salon-quality result from an obvious one.
| Technique | How it works | Best for |
|---|---|---|
| Layering | Removes bulk by cutting internal layers | Thick natural hair |
| Point cutting | Snips into ends at an angle to soften blunt lines | All hair types |
| Razor blending | Uses a razor to feather the extension edge | Fine or thin hair |
A professional stylist can assess your natural texture and recommend which blending method suits you best. If you are working at home, point cutting is the safest option because it is forgiving and easy to control. Practise on a small section before committing to the full head.
Common blending and styling mistakes to avoid:
- Cutting too much length off in one pass
- Using heavy oils near the tape bonds during styling
- Applying high heat directly to the adhesive strip
- Skipping a trim after installation, leaving a blunt, obvious line
- Washing extensions within 48 hours of application
For your first wash after installation, use a salon blending tips approach: lukewarm water, gentle downward strokes, and a sulphate-free shampoo. Avoid scrubbing at the roots. You can also review guidance on cutting your extensions for a step-by-step trim tutorial. Avoiding extension styling mistakes from the start protects both your natural hair and your investment.
Troubleshooting and common mistakes
Even with careful application, you may encounter a few hurdles. Here’s how to handle them.
Statistic: Up to 75% of tape-in extension mishaps are caused by improper placement or product residue, making these two factors the most important to control.
Common problems and how to fix them:
- Slipping extensions: Usually caused by oil or conditioner residue on the natural hair. Remove the weft, clean the area with an alcohol-based remover, and reapply with fresh tape.
- Visible bonds: The row was placed too high or the section was too thin. Reposition during your next move-up appointment.
- Tangling at the bonds: Caused by insufficient pressing. Use pliers to re-clamp the bond, applying gentle heat if needed.
- Scalp discomfort: Bonds placed too close to the root create pulling. Loosen the section and reposition the weft lower.
- Extension feeling stiff: Product build-up on the weft. Wash with a clarifying rinse, avoiding the bond area.
For a deeper look at fixes, the extension troubleshooting guide covers removal and reapplication in detail. Pairing that with solid hair extension care tips prevents most of these issues from recurring. You can also explore extension application solutions for additional troubleshooting strategies.
Pro Tip: Schedule a quick self-check every two to three weeks. Run your fingers gently along each bond row to feel for any looseness or shifting. Catching a slipping weft early means a simple re-press rather than a full removal.
Caring for tape-in extensions: Aftercare essentials
Finally, to keep your new look going strong, let’s cover everything you need to know about caring for your tape-ins. Proper aftercare can extend the life of tape-in extensions up to eight weeks, which means your investment goes much further with just a few consistent habits.
Daily and weekly care routine:
- Brush from ends to mid-lengths before working up to the roots, using a soft-bristle or loop brush
- Wash two to three times per week maximum using a sulphate-free shampoo
- Apply conditioner only from mid-length to ends, never at the roots or bonds
- Use a heat protectant spray before any blow-drying or heat styling
- Avoid chlorinated or salt water without first protecting extensions with a leave-in conditioner
- Sleep with hair in a loose braid or plait to prevent overnight matting and tangling
Nightcare is non-negotiable. Friction from a cotton pillowcase causes frizz and matting around the bonds. Switch to a silk or satin pillowcase, or wrap your hair in a silk scarf before bed. This one change alone can add weeks to your wear time.
Signs it’s time for a move-up or replacement:
- Bonds have grown more than 4 cm from the scalp
- Wefts feel loose even after re-pressing
- Visible matting at the bond that brushing cannot resolve
- Natural hair shedding noticeably more than usual
For a complete extension aftercare routine and additional longevity tips, dedicated guides will walk you through seasonal adjustments and product recommendations. A solid extension care guide can also help you build habits that protect both your extensions and your natural hair.
What most tutorials overlook: Building confidence in your technique
With your technical foundation in place, there’s still one piece many guides leave out. Most tutorials focus heavily on products and precise steps, but they rarely acknowledge that real skill comes from repetition and honest self-evaluation.
The first time you apply tape-ins, something will not go perfectly. A row might sit slightly crooked, or one bond might feel less secure than the others. That is not failure. That is data. Every small imperfection teaches you something a written guide cannot: how your specific hair behaves, how much tension feels right, and where your natural parting wants to fall.
Whether you are a home enthusiast or a newly qualified stylist, the temptation is to chase a flawless result on the very first attempt. Resist that pressure. Instead, document what works and what doesn’t after each application. Over time, your hands develop muscle memory that makes the process faster and more precise. Reviewing stylist advice from experienced professionals can accelerate this learning curve, but nothing replaces the confidence that comes from practising the technique yourself and refining it session by session.
Ready for flawless tape-ins? Shop premium extensions
Feeling confident to create your own seamless transformation? Here’s your next step.
At Gaurash Hair, we source 100% raw Indian virgin hair that blends beautifully with a wide range of natural textures. Our tape-in extensions are crafted for both professional salon use and at-home application, giving you salon-quality results without the guesswork.
Explore our Indian tape-in extensions for a silky, straight option that lies flat and blends seamlessly. If you prefer a different texture, our straight human hair extensions offer unprocessed, natural softness that holds colour and heat beautifully. Browse our full extension collection to find the perfect match for your hair goals and build a look that is entirely your own.
Frequently asked questions
How long do tape-in extensions last?
Tape-in extensions last six to eight weeks before needing a move-up appointment, provided you follow a consistent aftercare routine and avoid oil-based products near the bonds.
Can I install tape-in extensions myself at home?
Yes, with the right tools and a bit of practice, many people achieve salon-like results at home. Starting with a smaller set of wefts helps you build technique before tackling a full head.
How do I wash hair with tape-in extensions?
Wash gently with a sulphate-free shampoo using downward strokes, and keep heavy conditioners away from the roots to prevent bond slippage.
What should I do if tape-ins start to slip or fall out?
Improper placement or residue are the most common causes of slipping. Clean the area with an alcohol-based remover, apply fresh tape, and re-press firmly. See a stylist if the problem persists.
Are tape-in extensions safe for thin or fine hair?
Tape-ins are suitable for most hair types when applied correctly. For fine hair, use lighter wefts and avoid overloading any single section to prevent unnecessary tension on the follicle.
Recommended
- Tape-in extensions: seamless length and volume made easy – Gaurash Beauty Supply
- Tape-in extensions: 6–8 weeks to effortless style – Gaurash Beauty Supply
- 7 Types of Hair Extensions for a Natural Look Explained – Gaurash Beauty Supply
- How to cut hair extensions: Step-by-step tutorial for a natural look – Gaurash Beauty Supply